How to create a taper thread profile with CAD software
In this article, I would like to introduce a typical way to create a taper thread profile in any CAD software. Taper threads include Taper Pipe Thread (PT R Rc), National Pipe Thread (NPT). In common, there are five steps to creating a thread profile:
- Step 1: Search for the thread dimensions.
- Step 2: Create the fundamental triangle of the thread.
- Step 3: Create lines for pitch diameter, major diameter, and minor diameter.
- Step 4: Trim away lines to create a basic shape for the thread.
- Step 5: Copy the basic thread form to create multiple thread forms.
Let’s begin by making a thread profile for an external national pipe thread NPT 1/16.
Step 1: Search for the thread dimension
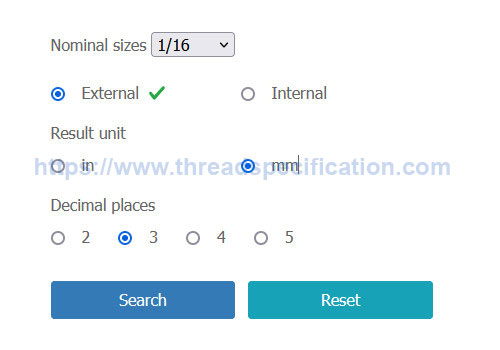
Go to the National Pipe Thread (NPT) page. First of all, we got the thread form angle of 60° and taper rate of 1 in 16 from the “Profile” section. Next, scroll down to the “Dimensions” section, choose 1/16 for the nominal size, and select External. Finally, press the “Search” button.
Scroll down to the “result” field to get the result for all dimensions. Here is the result for external NPT 1/16. We concentrate on the pitch and diameter dimensions.
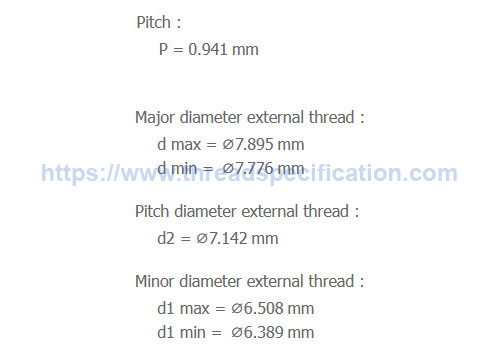
The pitch of an external NPT 1/16 was determined to be 0.941 mm. The diameter dimensions and their radius are given in the following table:
| Type | min value | max value | average value |
|---|---|---|---|
| Major dia. d | 7.776 | 7.895 | 7.8355 |
| Minor dia. d1 | 6.389 | 6.508 | 6.4485 |
| Pitch dia. d2 | 7.142 | 7.142 | 7.142 |
Now go to step 2.
Step 2: Create the fundamental triangle of the thread
After getting all the diameter dimensions, pitch, and angle of the thread form, we continue to create the fundamental triangle. You can find the definition of the fundamental triangle here.
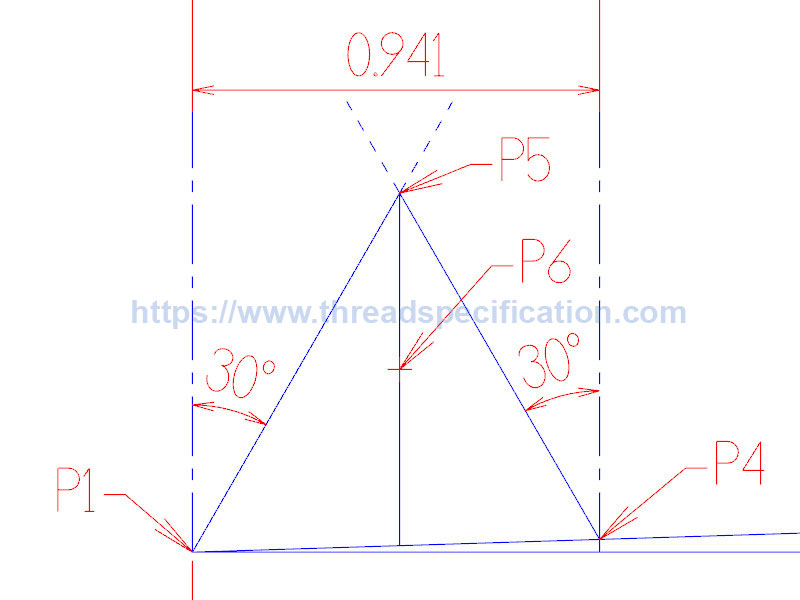
First, create a horizontal line P1P2 whose length is 16 mm; this line also stands for the axis of the thread. From P2, create a vertical line in direction Y+ whose length is 0.5 mm, and call P3 the end of this line. Connecting P1 to P3, we get a line P1P3 that stands for taper rate 1 in 16.

From P1, create a vertical line. Offset this line a distance equal to one pitch (0.941 mm) in the direction toward point P2. Call P4 the intersection point of this offset line and the line P1P3.
From P1, create a line that inclines 30° from the vertial. The inclined angle is 30° because it is equal to half of the thread form angle, which is 60°/2 = 30°. The length of the line is arbitrary.
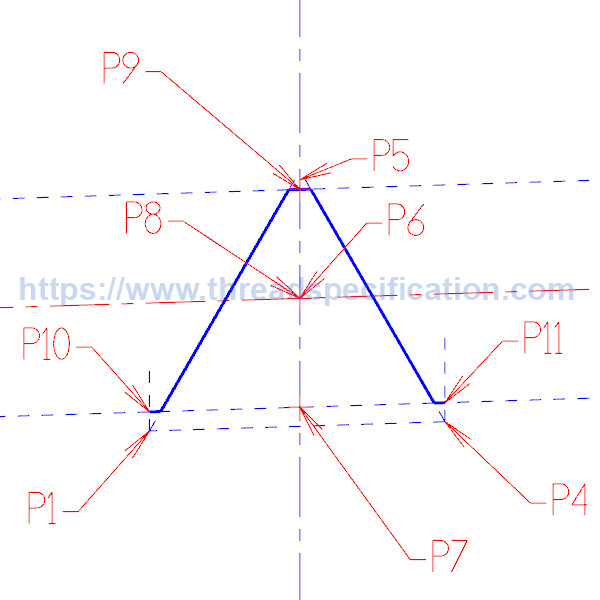
From the point P4, we also create a line that inclines 30° from the vertical. The length of the line is arbitrary. Call P5 the intersection point of two inclined lines from P1 and P4. Connect P1 and P4, trim the unnecessary lines, and we have the fundamental triangle of NPT 1/16 thread.
From P5, create a vertical line that ends in the P1P4 line. This line is the height of the fundamental triangle. We call the middle of this line P6, which is used to determine the pitch diameter. We finish creating the fundamental triangle of thread. Let’s continue to step 3.
Step 3: Create lines for pitch diameter, major diameter, and minor diameter
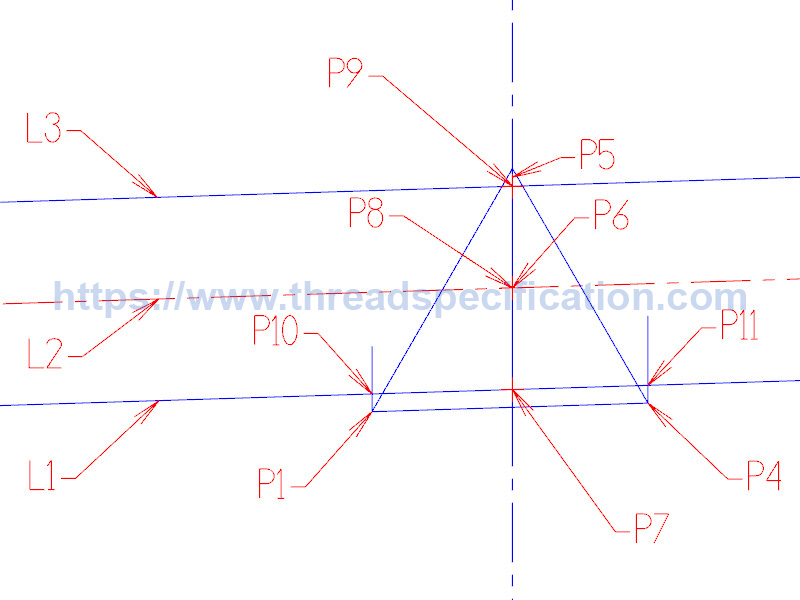
First, create a vertical line anywhere that you want. We call this line L0, which stands for the gauge plane used for measuring the diameters of thead. On this line L0, we create three points: P7, P8, and P9. The distance from P7 to the axis of thread P1P2 is equal to half the minor diameter (the radius of the minor diameter), which is 3.2243 mm. The distance from P8 to the axis of thread P1P2 is equal to half the pitch diameter (the radius of the pitch diameter), which is 3.571 mm. The distance from P9 to the axis of thread P1P2 is equal to half the major diameter (radius of the major diameter), which is 3.9178 mm.
Through point P7, create a line that is parallel to the taper rate line P1P3. Call this line L1, which stands for the minor diameter d1 of the thread. Through point P8, create a line that is parallel to the taper rate line P1P3. Call this line L2, which stands for the pitch diameter d2 of the thread. Through point P9, create a line that is parallel to the taper rate line P1P3. Call this line L3, which stands for the major diameter d of the thread.
Now move the entire fundamental triangle from point P6 to point P8.
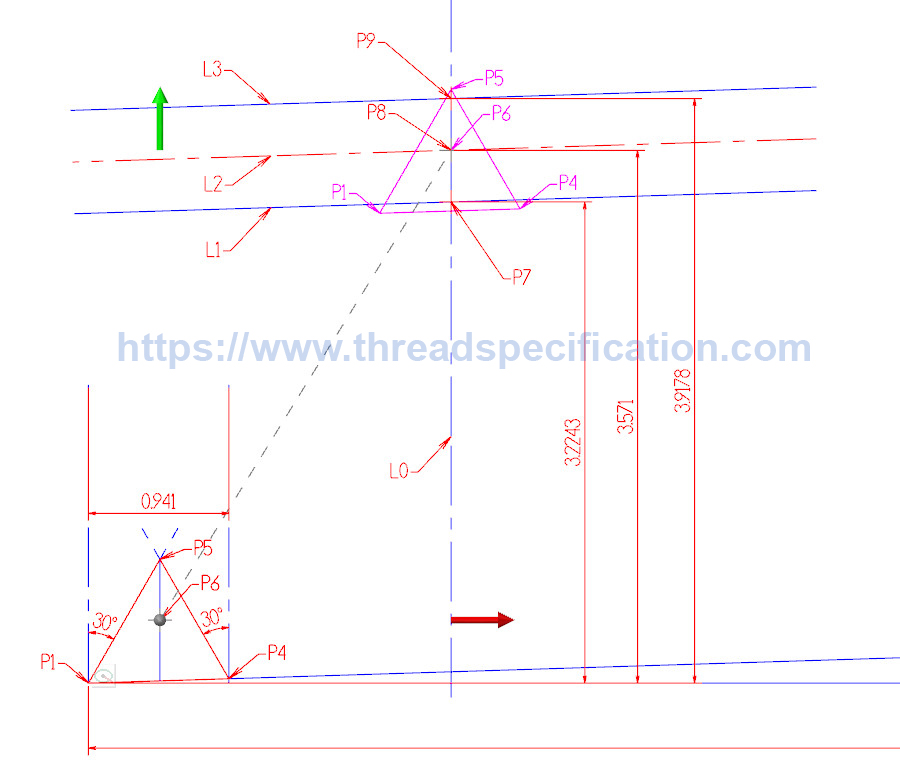
After moving the fundamental triangle to point P8, from point P1 of the fundamental triangle, we create a vertical line that goes through L1. We call P10 the intersection point of L1 and this line. And, from the fundamental triangle’s point P4, we create a vertical line through L1. We call P11 the intersection of L1 and this line. We finish step 3 and go to step 4.
Step 4: Trim away lines to create a basic shape for the thread
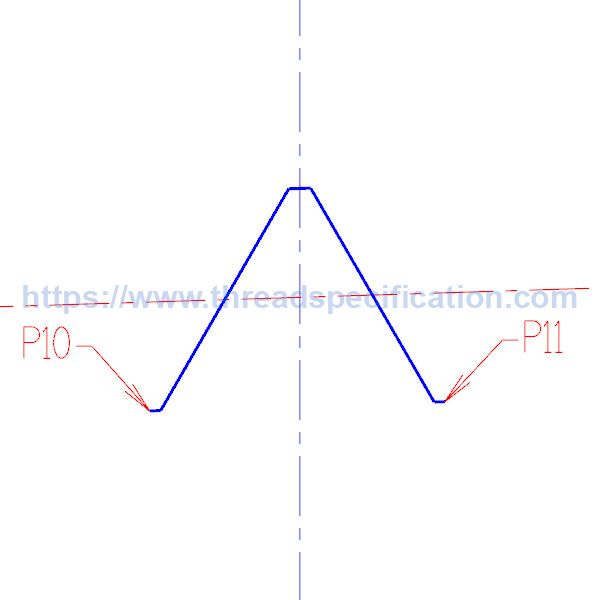
Trim away all unnecessary lines, and we get the basic form of thread.
Step 5: Copy the basic thread form to create multiple thread forms
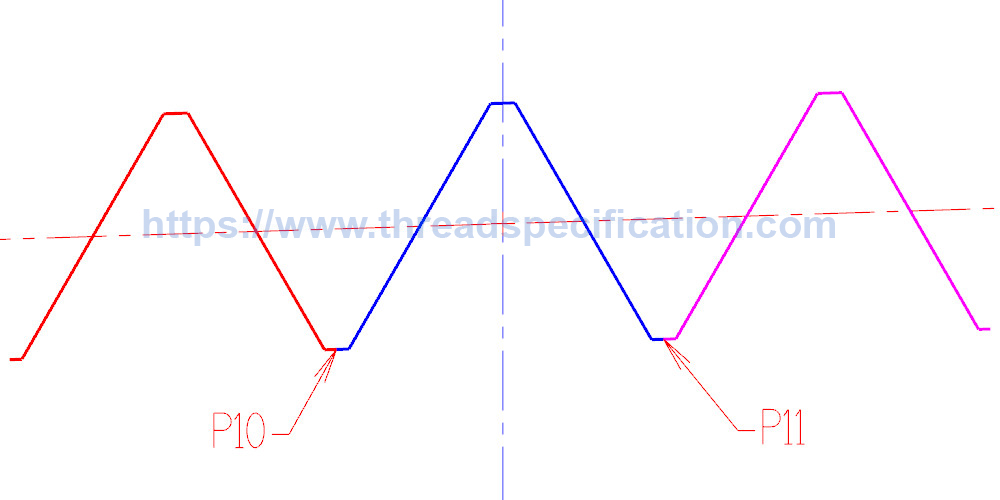
Copy the entire basic thread form from point P10 to point P11 or from point P11 to point P10 to create multiple thread forms. We have completed the thread profile of the external national pipe thread NPT 1/16.
The way to create an internal thread profile is the same as with an external thread. When creating the external thread profile, we create the “thread form” (male or top of thread), but when we create the internal thread profile, we create the “valley form” (female or bottom of thread).